Studio Home’s Julia Atkinson-Dunn knows a thing or two about flowers. Here’s how to grow and arrange her favourite blooms like floral-pro.
1. Dahlias
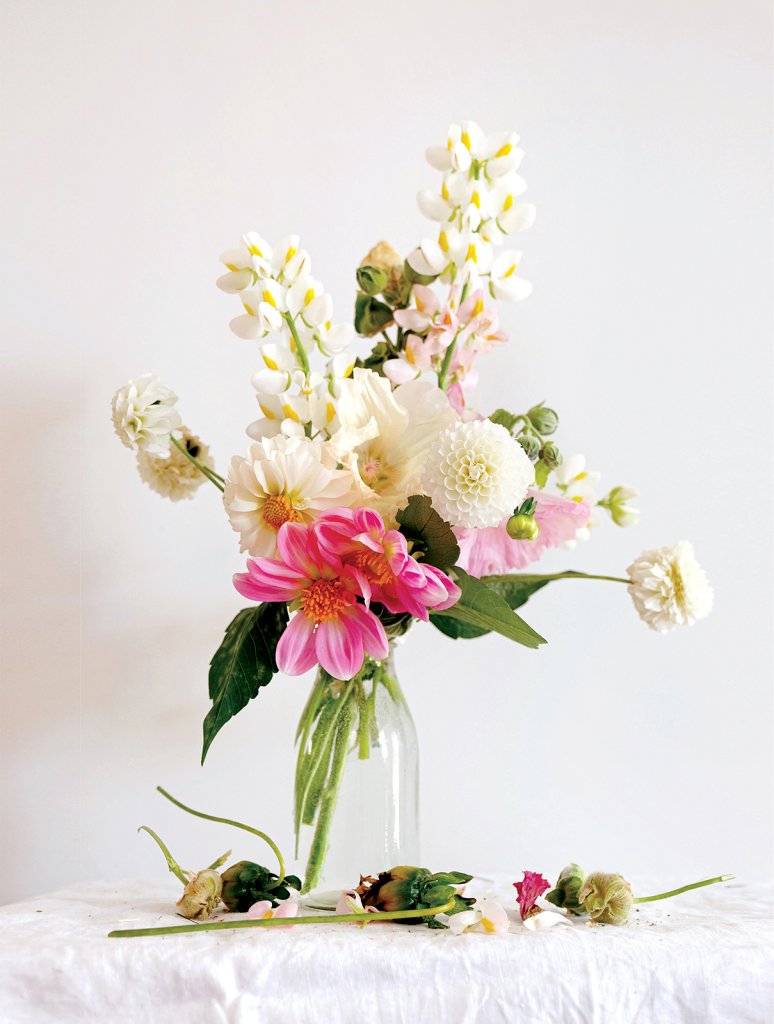
When I was fresh to flower gardening, dahlias were a kind of rite of passage. After I had played around with fun annuals, then dipped a toe in uncomplicated perennials, dahlias not only demanded a little more attention in their preparation and care, but rewarded me with the most impressive blooms.
How to grow Dahlias
Dahlias come in a huge and endless rainbow of colours and species. These are mostly identified by the form of their blooms and include cactus, decorative, pompom, ball, anemone, collarette, single, peony, orchid, waterlily and dinner plate, among other subspecies. It’s really exciting to trawl through dahlia catalogues to make your choice!
They need a sunny spot, with dappled shade at the very most. They also have brittle stems and limbs that may well need support as they mature.
Dahlias are most commonly grown from tubers, weird- looking storage organs that not only deliver you a flowering plant in their first season, but also readily multiply to be dug up and divided to create more plants in the future.
Plant your dahlias when you are well clear of frosts in mid to late spring. Lie tubers horizontally with the eye facing upward in a hole around 10-15cm deep.
Dedicate yourself to picking for a vase or deadheading spent flowers during the season. Removing them before they form seed heads will encourage your plant to keep producing. Do this by cutting the flower and its stem off right near the point it meets the main stem. It is from that wee intersection that a new stem will form.
In late autumn, with the arrival of frosts, your plant will slowly start “putting itself to bed”. No longer blooming, leaves will start to die back and you should let them do so before pruning completely for winter. The clump needs to feed off its wilting foliage, so wait a few weeks to then simply cut off all stems close to the ground.
To lift or to leave?
In colder climates that experience months of snow, gardeners gently dig up and “lift” their dahlia clumps, storing them in a dry, dark place over winter. In spring, before planting, they will divide these clumps to create new plants which they can sell, give away or replant. The jury is still out for me here in coastal Canterbury. I have lifted clumps over winter to divide, then replanted with success. I have also left them in the ground with a nice thick layer of mulch over the crowns of the clumps which I dust off in early spring.
Regardless of whether you choose to lift or leave your dahlias, it is a good idea to dig up and divide every few years. You will be amazed at the multiplication of tubers below ground level! Dividing is not nearly as intimidating as it sounds. Armed with my phone, I carefully snip through my clumps, removing small or damaged tubers and identifying healthy ones with an “eye”, all the while kept in good company by a YouTube garden expert doing the same.
My favourites
The first dahlias I ever planted are still my favourites – tall-growing pompom ‘Rococo’ with its deep crimson balls, and ridiculously lush ‘Shiloh Noelle’ with her huge blooms, a blush centre and creamy petals. ‘Shiloh Noelle’ is a decorative dahlia that’s an interesting alternative to florist favourite ‘Café au Lait’.
For the vase
You’ll no doubt become a dahlia watcher, noticing as your buds begin to bloom, deciding which you’ll leave and which you’ll cut for the vase. Dahlia blooms have the best chance at a good vase life if picked just as they have opened fully.
2. Cosmos

Once you have cosmos in your garden, you won’t want to do without them. They bring a rambling, wild lightness, greeting you with sunny faces and delicate, winding stems amid light, ferny foliage. There are lots of beautiful and novel varieties to be explored, and providing you can give them a sunny spot and a gentle deadhead when needed, they will flower and flower until the frosts hit.
How to grow Cosmos
Easily cultivated from seed, cosmos are also good self-seeders without being invasive. Punnets of cheerful healthy seedlings can also be purchased in spring and summer to plant directly into the garden. Alternatively, sow seeds in New Zealand from early summer, or raise seedlings under cover from mid spring, planting out in late spring to early summer.
Once seedlings develop 2-3 pairs of leaves, pinch out the growing tips to encourage a bushier plant. This seems scary, but you will be on the receiving end of triple the blooms.
To harvest for your vase or encourage endless flowering until the first frosts, simply snip off spent flowers close to where they meet the stalk.
As the season cools, halt deadheading and let your flowers go to seed in early autumn. Allow them to dry completely on the plant before either snipping off heads to store in a dry envelope or scattering in position to encourage a nice self-seeded crop next year. Once plants look like they are dying, simply pull out from the roots and throw in the compost or green bin, leaving that part of your garden clear for self-seeded seedlings in spring or whatever else you choose to plant!
My favourites
For your classic cosmos form, look for punnets of ‘Sonata’ in white and pink from garden centres. Just be sure you identify them as dwarf or tall! As eager, strong germinators, they are fun to grow from seed, so look out for ‘Sea Shells’, which has crazy fluted petals, or ‘Cupcake’, which, astonishingly, looks like paper cupcake wrappers. For richness in colour, find burgundy ‘Rubenza’ or for soft yellow tones, choose ‘Apricot Lemonade’. ‘Double Click Cranberries’ is a must for those seeking impossibly frou-frou blooms.
For the vase
Cosmos are long-lasting cut flowers that give a lovely casual romance to all bunches. They look amazing gathered en masse with their lacy foliage as much as they do weaving through a mix of their seasonal friends.
3. Japanese Anemones
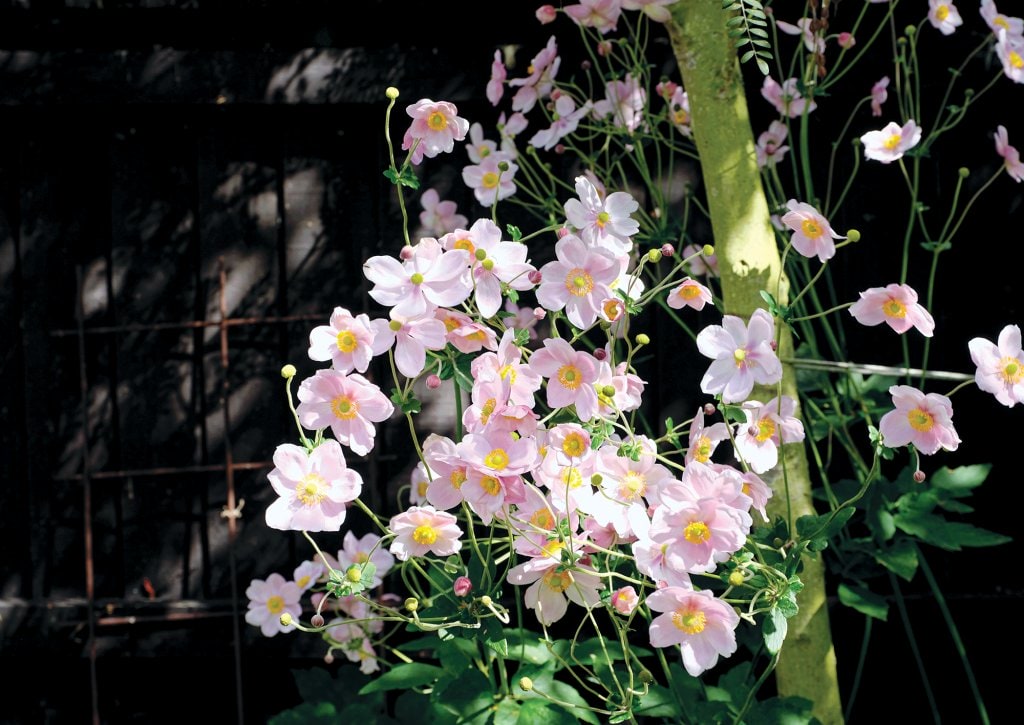
Just when you feel a bit sad about the end of summer, the happy faces of Japanese anemones rescue you and your garden. For me, they are endlessly satisfying both in the garden and in the vase, adding interest with their long stems emerging from broad, leafy clumps – they come with an inbuilt cheeriness.
How to grow Japanese anemones
The fastest and easiest way to establish Japanese anemones in your garden is by planting divisions or root cuttings. Japanese anemones take around two years to really establish and then you’ll notice not only that the main clump will increase in size, but that it will shoot out runners which are forming new small plants away from the original. It’s these that can be very easily lifted and relocated as you please. After replanting these babies, they will look as if they are dead, but it won’t be long until you see new green shoots emerging. Plant them around 60cm apart as they will certainly claim their space.
After flowering, I allow my plants to form their attractive seed heads and cut the entire plant down to around 20cm above the ground in winter, from where it will regenerate with lush, healthy foliage in the spring, preparing for flowering in late summer.
My favourites
There are so many variations of Japanese anemone out there and, due to them being “thieved”, I don’t know exactly which mine are. I believe my white one is Anemone x hybrida, and my pink one perhaps the same. However, with a little research you’ll see there are some fabulous deeper pinks and double blooms out there. Have some fun!
For the vase
Japanese anemones are totally glorious cut flowers! Every piece of them in fact. Their lovely long stems allow you to scale up your normal arrangements and they have a terrific vase life. Don’t overlook making use of their lush foliage, and I am super fond of their little ball-like seed heads that reveal themselves when the petals drop.
Often I am able to graduate the stems that have long since lost their petals from one arrangement into another. Allow them to dry standing in a vase, for an arrangement through the winter months. They are such a terrific shape!