With three basic ingredients and a bit of creativity, you can give old containers new life.
You will need
Resene Waterborne Smooth Surface Sealer
Resene testpot brush and art brushes
4 cups standard plain flour
1 cup table salt
1 cup warm water
Bowl to mix
Baking paper
Rolling pin
Knife
Super glue
Resene testpots (see colours listed)
Resene Concrete Clear
Step-by-step
1 Gather some old vessels that you would like to upcycle. Clean them, then paint with a coat of Resene Waterborne Smooth Surface Sealer and set aside to dry. If covering darker colours, you can paint a base coat of Resene White as well.
2 Mix, flour, salt and water into a bowl (A) until combined.
You don’t want your dough to be too dry or too wet, so adjust if necessary. Knead for 10 minutes, or until your dough is smooth and holds its shape well (B).
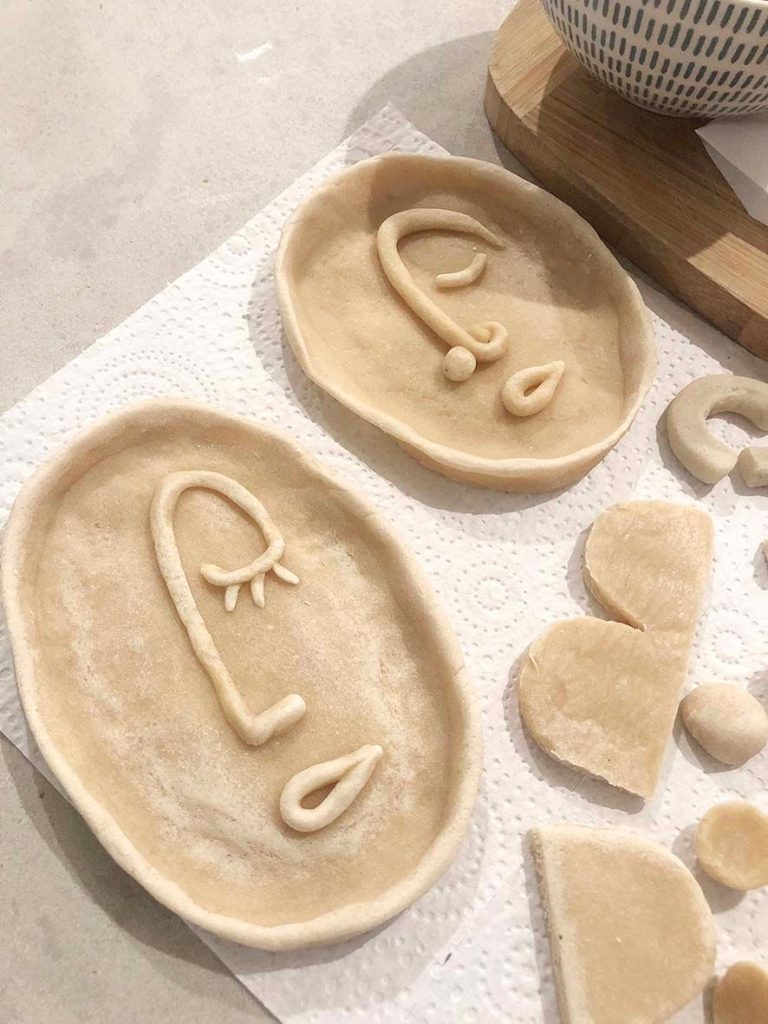
3 To make a trinket tray, take a handful of dough and roll it between two sheets of baking paper (C).
You’re after an organic shape – it doesn’t have to be perfect. Once you’re happy with your dish, roll another piece of dough into a long sausage about 1cm thick, and knead it around the edge of the dish to make a lip. Use your fingers to pinch and smooth out the join (D).
4 Roll out some more pieces of dough to create a face (E) and place on top of the dish. Press down lightly so they stick.
Place onto a baking tray lined with baking paper and set aside while you make more objects (F).
5 To create a fun bubble vase, roll out a piece of dough into thick sausage, then cut it into even-sized pieces (E).
Roll pieces between your palms to make balls, then place them onto your baking paper, flattening the underside. Make enough to cover your entire vessel. Experiment with shapes and sizes, but make sure your dough isn’t too thick or it will take longer to dry. We also made some arches and small handles.
6 Set your creations aside to air dry for a day (this prevents puffing), then place in the oven at 120°C for 2-3 hours, or until your dough is nice and hard. NOTE: If your oven is too hot, your dough will puff. Low and slow is best.
7 Once cool, super glue all your pieces to your chosen vessels and let set (G). You can use some sandpaper to lightly sand any rough edges.
8 Paint each piece in your favourite Resene colour. We love the soft calming hues of Resene Longitude (I).
We also love Resene Lemon Twist (J).
Give each piece two to three coats of paint. Leave enough time between coats for paint to dry properly. This will stop the salt dough from becoming too wet, and will also reduce the risk of paint lifting. For the face of our trinket tray we highlighted the features using Resene Stinger (K).
9 To finish – and to make your pieces last longer – seal with a coat of Resene Concrete Clear.
Resene colour tip
For a little extra glam, use Resene FX Metallic testpot colours for an effect that will shimmer in the light.